GRP hardness tester is a kind of indention hardness tester. It is widely used in Fiber Reinforced Plastics industry, most of Fiber Reinforced Plastics products are required to test Barcol hardness.
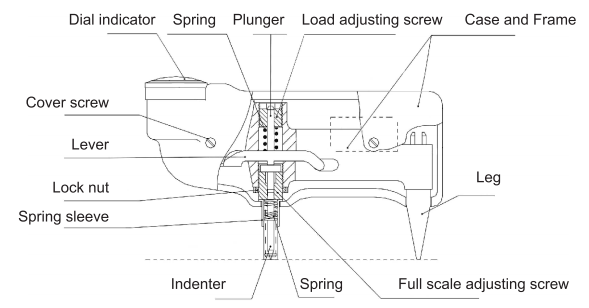
The structure of GRP hardness tester is illustrated in Fig.1.

Fig. 1 Structure of the Instrument
The main testing system of GRP hardness tester is set in the frame. The indenter is in the full scale adjusting screw (indenter sleeve) with a plunger loaded by load spring on top. The test force applied on indenter by load spring through plunger is adjusted by load adjusting screw. The plunger moves up and down along with indenter, thus, the dial indicator shows hardness reading through the lever. The legs fixed at the back of the frame can insure the indenter be perpendicular to test surface. The enclosures at both left and right sides protect the inner system from being damaged and changed.
The top of indenter is 0.76mm, equivalent to 100 degrees upper on the top surface of full scale adjusting screw when the hardness tester is under nonworking condition. The indicator pointed on zero at this moment.


