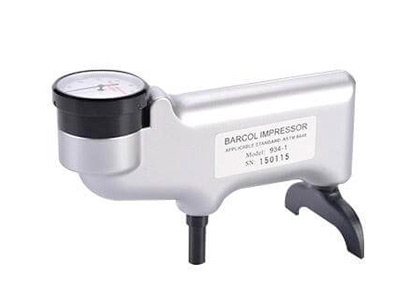
Barcol Impressor is an indentation hardness tester originally made in the USA. It has 3 models in series. 934-1 is the typical model which is in the widest application.
Barcol Impressor is mainly applied in two areas: One is aluminum fabrication industry, to test pure aluminum, soft aluminum alloys, thick aluminum alloys, aluminum belts, aluminum alloys extrusions, bars, castings, forgings and assembled aluminum alloy parts (e.g. Al-alloy door &window, curtain wall etc.) The relevant standard is American standard ASTM B648-00《Test Method for Indentation Hardness of Aluminum Alloys by Means of a Barcol Impressor》; the other is fiber reinforced plastics industry, most of the domestic and abroad fiber reinforced plastics products are required to test Barcol hardness. The relevant standard is American standard ASTM D2583-07《Test Method forIndentation Hardness of Rigid Plastics by Means of a Barcol Impressor》.
Barcol Impressor is light weight and portable. It can be used by single hand operation; no operating experience required; can test any workpiece which is reachable on any site. Barcol Impressor has following features: Wide valid testing range equivalent to Brinell hardness 25-135HBW. Used to test the hardness of all kinds of aluminum, from very soft pure aluminum to very hard aluminum alloys; Extended application. Model 934-1is applied to test the hardness of aluminum, aluminum alloys, copper, copper alloys, fiber reinforced plastics and rigid plastics etc. The modified models of it are available to test very soft metals such as lead, tin and other soft materials such as soft plastics, rubber, felt and leather etc; High sensitivity. Featured with 100 scales, it is much more sensitive than Webster hardness testers applied in aluminum alloys industry; No supporting is required. It can test from only one side of the workpiece. No need to move or support the workpiece. It is used to test very large or thick workpieces and assembly parts. The test results can be directly converted to HB, HR, HV and HW through conversion table.

Barcol Impressor is a kind of indention hardness tester. It uses a specially shaped indenter impressed into the specimen by a standard spring pressure and measures the indentation depth to obtain hardness value.
Barcol hardness value is: 
HBA — Barcol hardness value
h — Indentation depth (mm)
"0.0076" — Indentation depth for one unit of Barcol hardness
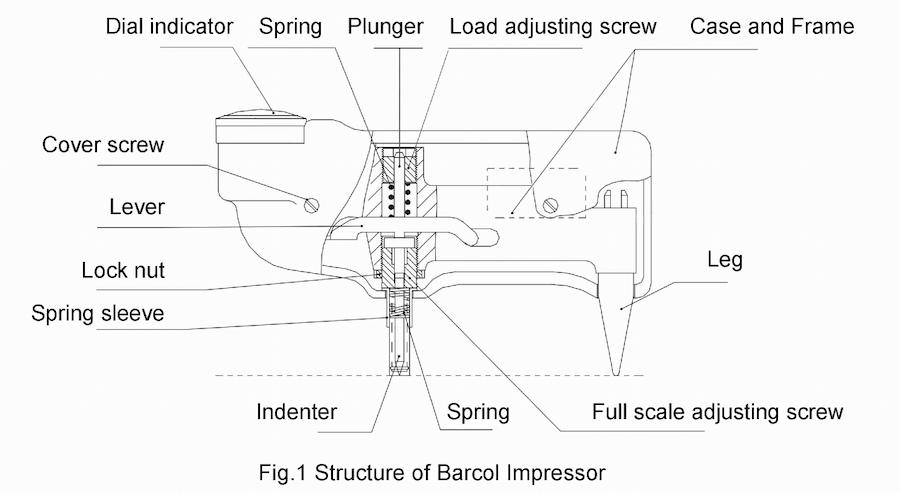
The structure of Barcol Impressor is illustrated in Fig.1.
The main testing system of Barcol Impressor is set in the frame. The indenter is in the full-scale adjusting screw (indenter sleeve) with a plunger loaded by load spring ontop. The test force applied on indenter by load spring through plunger is adjusted by load adjusting screw. The plunger moves up and down along with indenter; thus, the dial indicator shows hardness reading through the lever. The legs fixed at the back of the frame can ensure the indenter be perpendicular to test surface. The enclosures at both left and right sides protect the inner system from being damaged and changed.
The top of the indenter is 0.76mm upper on the top surface of the full-scale adjusting screw, equivalent to 100 degrees when the impressor is under nonworking condition. The indicator points at zero at this moment.

Indenter: 26° truncated cone, head face diameter 0.157mm
Testing Range: 0~100HBa, equivalent to 25~135HBW
Resolution: 0.5HBa
Indication error: hardness range 81~88HBa ±1HBa
hardness range 42~48HBa, ±2HBa
Repeatability: hardness range 81~88HBa ±1.5HBa
hardness range 42~48HBa, ±2.5HBa
Net weight: 0.5kg
4.1.1 Zero Point Verification
Check the position of the indicator hand. It should point at the “0” on the indicator dial.The tolerance range should be within one graduation. If it exceeds, please contact the manufacturer.
4.1.2 Full-Scale Verification
Put the impressor on a hard flat surface (e.g. glass sheet). Press on the enclosures to makes the indenter totally back to full-scale adjusting screw. Now the indicator should point at 100±1 (Note: Do not impact or make the indenter slide broadwise when pressing, otherwise the indenter will be damaged). If the test reading exceeds the tolerance range(1 graduation), calibration of the full scale should be carried out according to Step 5.3.
4.1.3 Indication Verification
Put the two standard hardness blocks on a hard flat surface and test them with the instrument. The test reading should be within the tolerance range of the hardness of hardness blocks. If not, calibration of the indication should be carried out according to Step 5.3.
4.2.1 The specimen surface should be smooth, clean, without mechanical damage. The surface can be lightly polished to remove the scratch and coating.
4.2.2 The thickness of the specimen should be no less than 1.5mm.Obvioustransformation should not be observed on the back of the specimen after testing. The dimensions of the specimen should also ensure the minimum distance between the indentation and each edge to be greater than 3mm.
4.2.3 To ensure accurate testing, the indenter must be vertical to the specimen surface. Thus, the dimension of the specimen surface should be big enough to make the leg of the impressor and the point of the indenter at the same level.
If the specimen is too small or narrow to make the leg of the impressor and the point of the indenter at the same level, block up the leg to realize it. Pay attention that the two surfaces of the leg should be at the same level.
4.2.4 Make sure there is no previous testing indentation within 3mm around current testing point.
4.2.5 The specimen must be placed stably. Small specimen should be placed on the stable backing (such as steel sheet, glass etc.) The specimen should not lift, move or transform during the testing procedure.
Hold the instrument and put it on the specimen stably. Apply the test force firmly and swiftly. Take the maximum reading on the dial estimated to 0.5 hardness unit. This reading result is the Barcol hardness value of the specimen. Do not impact or make the indenter slide sideways when pressing, otherwise, the indenter will be damaged.
When testing softer materials, the reading will be lower down gradually. Take the reading as promptly as possible to take the maximum reading result.
