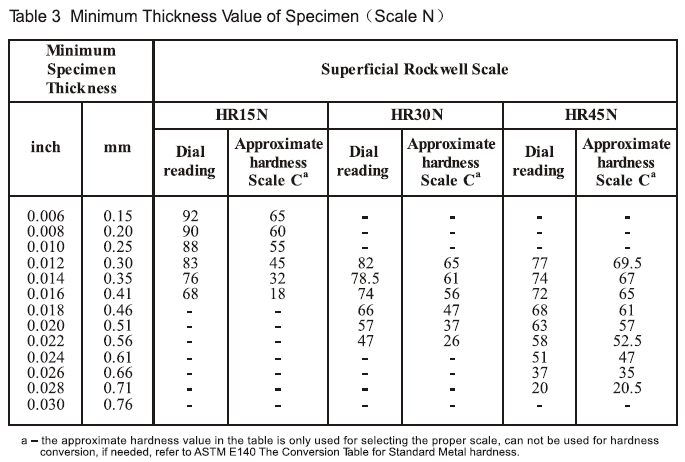
When the thickness of the thermal spray layer is thin, such as the thickness of the spray layer is less than 0.15mm, please refer to the metal coating and other related coatings Vickers and Knope microhardness test (see GB 9790 -- 88). When the thickness of thermal spraying layer is more than 0.15mm, surface Rockwell hardness N and T scales are used for hardness testing according to the hardness of spraying layer. The hardness of the sample is equivalent to 20 HRC ~ 65 HRC should be used in the N scale; The T scale should be used in the range of 99 HRB to 32 HRB.
1. Minimum thickness of spraying layer on N and T scales. According to the difference of sample hardness, the minimum thickness of spraying layer required by the N and T scales is shown in Table 3 and Table 4.

2. Sample. The spray layer of the sample shall be finely polished so as not to be affected by the deformation caused by temperature and sample preparation process.
3. Test. The holding time of the total teting force is recommended to be no less than 2 s for samples that do not continue to deform with time after the testing force is added. For the specimens that continue to deform with time after the testing force is applied, the holding time is 6 ~ 8 s. For the samples with obvious deformation after adding the testing force, it should be kept for 20 ~ 25 s. The distance between the center of two indentations or the distance between the center of the indentation and the edge of the sample is not less than 3 mm.
4. Results. Hardness values are accurate to 0.5 hardness units. Each sample shall give a hardness value of 5 consecutive points. The arithmetic mean of the five consecutive points is given, and the lowest and highest values are given.
