Be sure to have chosen the proper indenter and anvil before testing. This instrument is equipped with the diamond indenter and flat anvil before leaving factory. When changing the indenter and anvil, be sure to have the screws fastened tight. When using a hardness tester with an opening size >1 inch to test small specimens, an extension should be adopted and also fixed tight. After the indenter and anvil are changed or the extension is installed, a pretest should be made before the formal test. The result of the pretest should be neglected.

Check the position of the indicator hand. It should rest exactly on the red dot "0" on the indicator dial. If it doesn't, adjust the dial by turning the bezel to locate the red dot under the pointer.
Put the specimen into the opening of the tester with its back side contacting the anvil tight, and be sure to keep its testing surface vertical to the principal axis of the indenter. Turn the hand wheel to make the main shaft of the tester move to the left, and the indenter is made to hit on the specimen surface.
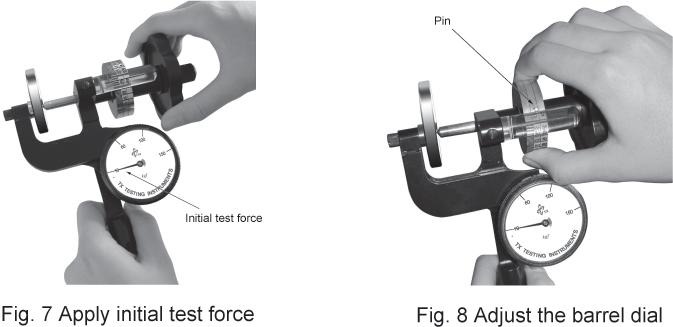
Slowly turn the hand wheel clockwise to bring the indicator hand to the position "10kg" of the initial test force ( for superficial Rockwell hardness tester it should be "3kg" ), see Fig. 7.

Rotate the barrel dial anticlockwise until its pin rests against the upper edge of the magnifier; see Fig. 8. Meanwhile, the operator should adjust the observing angle to make the full-scale benchmark line on the barrel dial ( the red scale mark 130, black scale mark 100 ) exactly aligned beneath the reading scale mark of the magnifier. The operator should keep this viewing angle also known as the viewing angle for reading the hardness value until the test is finished.
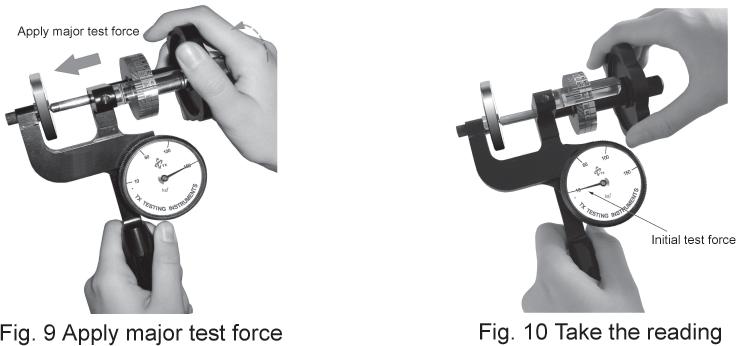
Rotate the hand wheel continuously and stably clockwise to bring the indicator hand to the position of total test force F=F0+F1 ( e.g., for HRC scale, F=150kg ). The indicator hand should be aligned exactly to the marked scale of the selected test force, see Fig. 9. ( If the pointer goes beyond the scale mark, the testing should be considered as failure. Unload the test force and choose a new point on the specimen to make a new test. )
The time duration from loading initial test force to loading total test force should be no more than 8 seconds.
After loading total test force, completely unload major test force within 2 seconds to bring the indicator hand back to the position of initial test force.
Looking through the magnifier, determine the superposition of reading line of the barrel dial aligned with that of the magnifier, the value of which represents the hardness value of this test. Each long scale mark on the barrel dial represents 10 hardness units, and the value is shown above the mark. Between every two long scale marks there are 5 (or 10) graduations, each of which indicates 2 (or 1) hardness units. The mid point of every 2 short marks indicates 1 (or 0.5) hardness unit. The 1/4 point between 2 short marks indicates 0.5 (or 0.25) hardness unit. The reading value should be estimated to 0.5 hardness unit as shown in Fig. 10.
For Rockwell hardness testers:
Read the black numbers under C on the barrel dial for Scales A, C, D with a diamond indenter; read the red numbers under B on the barrel dial for Scales B, E, F, G, H, K with a ball indenter.
For superficial Rockwell hardness testers:
Read the N-T graduations on the barrel dial.
